How to prep your stairs |
||||||
 |
||||||
|
If you're revamping your stairs, it's worth taking the time to prep them thoroughly first. Whether you're intending to stain or paint the staircase, put in a new carpet or replace individual stair parts, you will get better and longer-lasting results if you prepare all the timber surfaces properly beforehand. This can involve removing old stair carpet and underlay, stripping away paint or varnish, and sanding down the treads, risers, and balustrade ready to start afresh. Here we’ll go through everything you need to effectively prep your staircase for renovation, including buying the right materials, how to remove old carpet, and even perfecting the finished product. Welcome to your comprehensive stair prep guide! |
||||||
Removing the old stair carpet |
||||||
 |
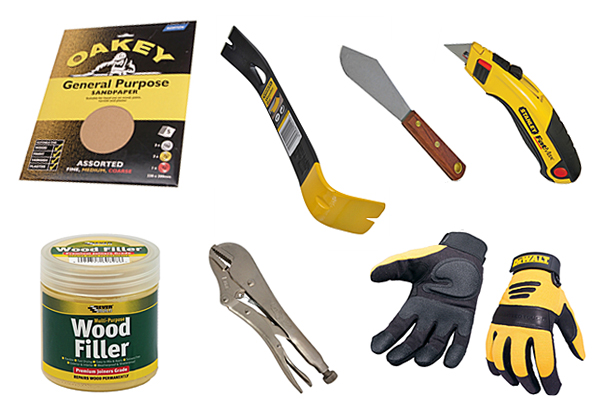
Get preparedYou may be tempted to rip the carpet out as quickly as possible, but to avoid damaging any staircase parts it's best not to be too eager. This can lead to further problems that will require an expert to fix. The job will be quicker with the right tools to hand. You will need pliers, a wonder bar (a type of pry bar), a utility knife, sandpaper, a putty knife, and wood filler. This may sound like a lot at first, but these tools guarantee an easy process. Wear thick gloves to protect your hands from tacks and staples, and be careful when handling the prongs on gripper rods, which can be particularly vicious. A hammer and chisel may suffice if you don't have a pry bar, although you might find it a little harder to get enough leverage. |
|||||
|
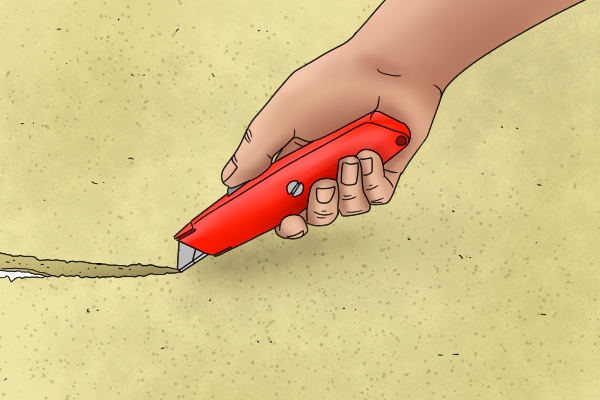
Starting at the top of the staircase, reach under the carpet with the wonder bar to free it from the gripper strips holding it in place. If the stairs are carpeted from end to end it can be difficult to find a starting point, so try sliding the blade of a small utility knife along one of the edges. Be careful not to scratch the wooden treads. If that doesn't work, use a pair of pliers to pull up a small part of the carpet so you can push the pry bar underneath. Yes, it can be a lengthy process, but if you’re careful, you can preserve your original staircase for as long as possible (which you’ll be thankful for in the long run). |
||||||
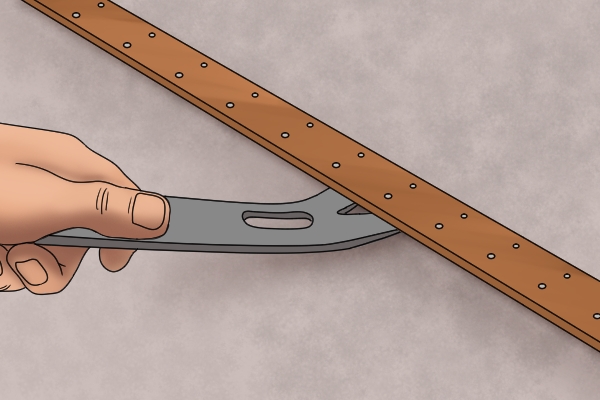
Use leverageThe stair carpet will probably be held in place by gripper rods, also known as tack strips or grippers. You’ll need to lever up the carpet with the wonder bar, moving cautiously to avoid damaging the surrounding wood. You may find the carpet is made up of several short sections, each wrapping over just one or two treads and risers. Alternatively, in the case of a straight stairway, it might consist of a single continuous piece. If you find you're dealing with one long roll of carpet, slice it into sections with the utility knife as you go, to make disposal easier. |
 |
|||||
 |
Tackle tack stripsIf you come to a transition strip - a connector used to discreetly join two sections of carpet, or to join stair carpet where it meets another type of flooring - cut the carpet at that point and leave the strip in place so you can use it again (unless you're going to leave the treads bare). As long as you're intending to recarpet the staircase, the other gripper rods can remain where they are - if they're in good condition. If they’re a bit worse for wear, look into replacements, to ensure maximum grip and no lifting. Remove any tack strips that are damaged or corroded, as rust can sometimes bleed through the carpet and cause staining, which isn’t ideal if you have a light-coloured carpet. Prise up unwanted grippers using the wonder bar or a hammer and chisel, and remove any underlay. Extract all tacks with the pliers, pry bar, a claw hammer, or nail remover. |
|||||
|
You should also pull up all gripper rods that are less than 6mm from the side of the treads if you are going to carpet the stairs from end to end (as opposed to installing a runner down the middle and painting or staining the timber on either side). This is because you will need a gap of at least this size to tuck in the edge of the new carpet against the side of the staircase - this just makes it look that little bit neater. |
||||||
Sanding the stairs |
||||||
|
Now it's time to prepare the stairs. Sand them down with heavy-duty sandpaper of around 40-60 grit. By following the grain of the wood, it’ll be much easier to remove old paint or varnish, and make all surfaces smooth and level. A mechanical sander will greatly speed up the process of smoothing the wood. We recommend using either a belt or random orbit sander on the broad stair components, such as treads and risers, and a detail sander (also called mouse sander) for getting into the corners and narrow stair parts. Sanding machines throw up a lot of dust and debris, so don't forget to wear a dust mask and safety glasses. A dust extractor attached to your sander, or even your vacuum cleaner, can greatly reduce the dust kicked into the air. Don't attempt to use a mechanical sander on the spindles. Instead, cut sheets of sandpaper into strips, wrap them around the posts and rub them up and down and back and forth by hand to remove the old finish. This can be a tedious job, but it means the original shape isn't damaged or diminished in any way. Do the same with the stair handrails and any other curved parts of the staircase bannisters that can't be easily treated with a sanding machine. |
 |
|||||
|
If you want to remove all the paint, consider the alternative of replacing the spindles. They're not as expensive as you might think, and could even save you money when compared with the price of sanding, paint strippers and cleaners, and the time involved - particularly if you're paying someone to do it for you! You could use this to switch up your style - opt for a different shape or material to create a new design feature in your home. |
||||||
 |
Be a smooth operatorIf you're going to lay a new carpet on the stairs, following the previous steps should be enough preparation. However, if you're intending to paint or stain the stairway, or install a runner down the centre of the stairs, you will need to perfect the surface. Go over the treads, risers, and stair balustrades again with finer sandpaper of 120 or even 240 grit until the timber is as smooth as you can make it. The Wonkee Donkee team advises you to follow the grain of the wood as closely as possible for the best results. Now to tidy up. Vacuum the entire staircase to remove all debris (don't forget to suck the dust out of the tack holes), then use a large decorator's sponge to clean all the surfaces with water and a mild detergent. Rinse thoroughly, and allow to dry completely - this may take a day or two longer, but will create the smoothest finish. |
|||||
Perfecting the surface |
||||||
|
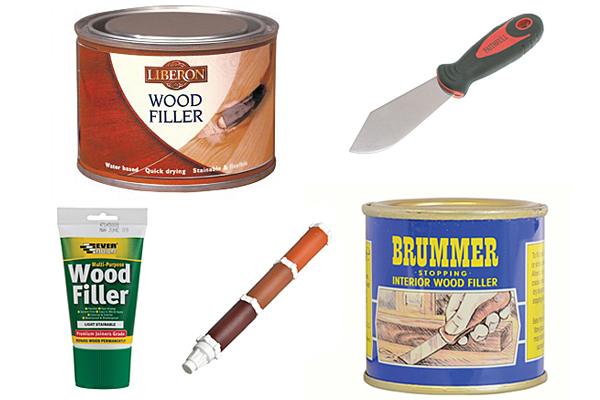
Choose a wood filler in as close a shade as possible to the colour of your staircase components (or the colour you are intending to stain them, if applicable) and apply carefully to all cracks, tack holes, and dents. Before staining stairs, it's a good idea to brush some wood filler onto a piece of scrap timber so you can see the colour it turns when it dries, so you don’t end up with a staircase darker than you anticipated. You can then dab on a little wood stain to see if it matches, and change the filler if necessary. Overfill the cavities slightly to compensate for the filler shrinking as it dries, then smooth over with a putty knife. Once the surface is completely dry, sand over the filled areas to make them flush with the surrounding timber. You are now ready to paint or stain your staircase. |
 |
|||||
Get in touch with Wonkee Donkee today!Do you have some further questions on prepping your staircase for a renovation? Or are you on the hunt for quality staircase parts? Already learned everything you need to know about stair prep? Shop our range of staircase parts today! The team here at Wonkee Donkee are always happy to help. If you want to know more about what we do, simply call us on 01938 557733 to chat with us directly. Alternatively, you can email us at [email protected] - if you include some details about your project and the materials you’re interested in, we can give you a full rundown of what you need.
|
||||||


